
Showing posts with label sunspot. Show all posts

Wednesday, June 11, 2008

Servo Car [ Sun SPOT app ] (8)

Let's glance over servocar-spots codes from here. First of all, check out source codes for release 1.0.0 as the following (For this, you need to have a subversion client installed on your computer and an account for java.net, so please prepare both of them if you don't have).
$ mkdir work; cd work
$ svn co https://servocar-spots.dev.java.net/svn/servocar-spots/tags/REL-1.0.0 servocar-spots --username <username>
You can, of course, check out sources from trunk, but I'm explaining the details based on this release (1.0.0).

Then, build & deploy two Sun SPOT applications - one is for a remote controller named "ServoCar-Controller" and the other is for an actuator of servos named "ServoCar-OnCar".
$ cd servocar-spots/ServoCar-Controller
$ ant deploy
$ cd ../ServoCar-OnCar
$ ant deploy
Next, let's look at the ServoCar-Controller codes, especially related to Sun SPOT networking & accelerometer on EDemoBoard.

Tuesday, June 3, 2008

Servo Car [ Sun SPOT app ] (7)

Sun SPOT application (MIDlet) class has to extend "javax.microedition.midlet.MIDlet" and its life cycle begins from startApp() method.
import javax.microedition.midlet.MIDlet;
import javax.microedition.midlet.MIDletStateChangeException;
// ...
public class SunSpotApplication extends MIDlet {
// ...

protected void startApp() throws MIDletStateChangeException {
System.out.println("Hello, world");
// ...
To rotate a servo with Sun SPOT, you only have to write the following 2 lines.
Servo serv0 = new Servo(EDemoBoard.getInstance().getOutputPins()[EDemoBoard.H0]);
serv0.setValue(2000);
For the details about "how to move/turn a servo motor", please refer to Servomechanism or Google says a lot about it. Here it's enough for you to know that a servo needs constant "square wave" to move/turn itself and its wave length directly maps to servo angle (or velocity for continuous rotation servo). A typical servo expects to see a pulse every 20 milliseconds and a 1500 microseconds (1.5 millisecond) pulse will make the motor turn to the 90 degrees (it's called "Neutral" position). Other pulses will do it based on their lengths as follows:
  • 1500 - value: 0 degrees
  • 1500 + value: 180 degrees
and the parameter "value" above may vary per servo, but typically it's from 250 to 500 (you may need to investigate your servo before using it). Servo#setValue(2000) just set this length to 2000 microseconds and keep sending pulse to the servo. It's all about your servo code on Sun SPOT!

If you have written embedded programs, you may notice it is not so easy to write the same program with C. Of course it depends on how many libraries you're provided, but typically you need a lot of include files as well as check how to use registers and command syntax for serial communication. Then, you also need to write a program that bring high a digital port, wait for around 1.5ms, bring low the same port (and loop these procedures for a while). Or even if you can use a bit high level operation like ATmega88 "8-bit Timer/Counter2 with PWM and Asynchronous Operation" to generate PWM (pulse-width modulation), the root complication is not solved as long as you use embedded C.

If you feel this is cool, NOW TIME TO CHANGE YOUR PLATFORM TO Sun SPOT!!

Tuesday, May 27, 2008

Servo Car [ Sun SPOT app ] (6)

Let's write a very simple Sun SPOT program for the servos here. We can begin it with the "SunSpotApplicationTemplate" project in ${SUNSPOT_DIRECTORY}/Demos directory (${SUNSPOT_DIRECTORY} is usually "C:\Program Files\Sun\SunSPOT" on Windows, but if you are true to my previous blog entry, it may be "C:\Sun\SunSPOT").

If you haven't had the Demos yet, you could also download it from the web site as we did before (see installing Sun SPOT SDK). Here is a quick summary to install Demos:
  1. access http://www.sunspotworld.com/spotmanager/ and click the Sun SPOT icon to launch Sun SPOT Manager tool
  2. Select "SDKs" tab
  3. Click "Demos" icon on the bottom-right corner (under Available SDKs)
  4. Press "Install" on the "Demo Installer" panel
Once you got it, please copy ${SUNSPOT_DIRECTORY}/Demos/CodeSamples/SunSpotApplicationTemplate directory into your working directory.
$ mkdir ~/work
$ cp -r ${SUNSPOT_DIRECTORY}/Demos/CodeSamples/SunSpotApplicationTemplate ~/work/ServoTest
$ cd ~/work/ServoTest
Then, modify the code src/org/sunspotworld/demo/SunSpotApplication.java with your favorite editor as follows:
  1. remove the lines from L.56 "long ourAddr = .." to L.66 above "notifyDestroyed();"
  2. add the following code (add bold lines to your code)
<..snip..>
import com.sun.spot.sensorboard.peripheral.ITriColorLED;
import com.sun.spot.sensorboard.peripheral.Servo;
import com.sun.spot.peripheral.radio.IRadioPolicyManager;
<..snip..>
public class SunSpotApplication extends MIDlet {
private static final int CENTER = 1500;
private static final int RANGE = 1000;

private ITriColorLED [] leds = EDemoBoard.getInstance().getLEDs();

protected void startApp() throws MIDletStateChangeException {
System.out.println("Hello, world");
new BootloaderListener().start(); // monitor the USB (if connected) and recognize commands from host

EDemoBoard demo = EDemoBoard.getInstance();
Servo serv0 = new Servo(demo.getOutputPins()[EDemoBoard.H0]);
Servo serv1 = new Servo(demo.getOutputPins()[EDemoBoard.H1]);
serv0.setValue(0);
serv1.setValue(0);
Utils.sleep(500);

for (int i = 0; i < 4; i++) {
int r = (i % 2 == 0) ? RANGE / 2 : -RANGE / 2;
serv0.setValue(CENTER + r);
serv1.setValue(CENTER - r);
System.out.println("serv0 value: " + serv0.getValue());
System.out.println("serv1 value: " + serv1.getValue());
Utils.sleep(2000);
serv0.setValue(0);
serv1.setValue(0);
}

notifyDestroyed(); // cause the MIDlet to exit
}
<..snip..>
}

Then build your project with "ant jar-app". This command compiles all the codes under the project and create jar file under "suite" directory.
$ ant jar-app
$ ls suite
SunSpotApplicationTemplate_1.0.0.jar
Let's deploy this jar file into Sun SPOT Servo Car (configured before) and run the application. To do so, connect Sun SPOT to your PC via USB cable and execute the following commands.
$ ant deploy
<..snip..>
deploy:

BUILD SUCCESSFUL
Total time: 8 seconds
$ ant run
<..snip..>
-run-spotclient-once:
[java] SPOT Client starting...
[java] [waiting for reset]

[java] Local Monitor (purple-071018)
[java] SPOT serial number = 0014.4F01.0000.01A8


[java] ** VM stopped: exit code = 0 **


[java] Squawk VM Starting (purple-071018)...
[java] [NetManagementServer] starting on port 20
[java] Hello, world
[java] serv0 value: 2000
[java] serv1 value: 1000
[java] serv0 value: 1000
[java] serv1 value: 2000
[java] serv0 value: 2000
[java] serv1 value: 1000
[java] serv0 value: 1000
[java] serv1 value: 2000


[java] ** VM stopped: exit code = 0 **


[java] Exiting

-run-spotclient-multiple-times-locally:

-run-spotclient:

-post-run:

run:

BUILD SUCCESSFUL
Total time: 14 seconds

If you can watch one servo rotates clockwise (for 2 seconds), counterclockwise (for 2seconds), clockwise (for 2seconds) and counterclockwise (for 2seconds) while the other servo does reversely, your program is now successfully deployed into your Sun SPOT. Next time, let's investigate this code a little more.

Saturday, May 24, 2008

Servo Car [ Sun SPOT app ] (5)

I've written how to install Sun SPOT SDK, but missed a few things to mention. So I'm doing them here.

First of all, the Project Sun SPOT official URL is http://www.sunspotworld.com/. You can download SDK, tutorials and manuals here. You can also ask your questions at the forum in this site as well as purchase Sun SPOT Java Development Kit. So this is the start point for your Sun SPOT life.

Before installing Sun SPOT SDK on your computer, you need
installed on your computer (See the installation instructions in your Sun SPOT Java Development Kit for the detail).

Now, we've had all stuff, hardware & software, to write a code for the Sun SPOT Servo Car. Next time, I'm planning to begin with a very simple code other than this, but if you'd like to try it in advance, you can freely check out it from https://servocar-spots.dev.java.net/.

Thursday, May 22, 2008

Servo Car [ Sun SPOT app ] (4)

Software setup

Let's write a first Sun SPOT application for Servo Car! Typically, Java IDE (like NetBeans) is very useful to write a large Sun SPOT application and I usually use it. However, to make things easy, let's begin with minimal developing environment -- Sun SPOT SDK, your favorite text editor & terminal.

Sun SPOT SDK has a color name according to its version. The current stable version (as of 5/23/2008) is v3 ("Purple" release), so let's use this version for the demo.

If you have a Sun SPOT Java Development Kit with Purple SDK CD-ROM, you may install it from CD. Otherwise, you can install SDK from http://www.sunspotworld.com/spotmanager/. This site keeps many different SDK versions other than Purple (v3) including beta versions, so I recommend the latter and will explain how to install SDK by using this site.

How to install Sun SPOT SDK
  1. access http://www.sunspotworld.com/spotmanager/ and click the Sun SPOT icon to launch Sun SPOT Manager tool
  2. Select "SDKs" tab
  3. Select purple-071018 (it may be labeled "Purple Beta RC5") from Available SDKs. If you don't see any versions in it, press "Refresh" button under Available SDKs.
  4. Press "Install" and "Sun SPOTs SDK Installer Tool" will be launched.
  5. Accept defaults other than "New SDK Directory Location". If you're a Windows user, it may begin with "C:\Program Files\Sun ..". There is no problem with this to develop Sun SPOT applications. But if you use Sun SPOT emulator, it causes some problems. So change this location ("C:\Program Files\Sun ..") to other place (e.g. "C:\Sun .."). For details, please refer to https://www.sunspotworld.com/forums/viewtopic.php?p=2809.
  6. Press "Install". After installing, press "Done".
  7. You should see the installed SDK on "Installed SDKs" panel.
If you change the "New SDK Directory Location" according to the above procedure, please edit .sunspot.properties and change "sunspot.home" value to meet your change.

To confirm your installation, connect a Sun SPOT to PC via USB cable , open your favorite terminal emulator and check the following command output.

$ cd $(SDK_DIRECTORY_LOCATION) <- specify your directory 
$
ant info
<..snip..>
-run-spotclient-once:
[java] SPOT Client starting...
[java] [waiting for reset]

[java] Local Monitor (purple-071018)
[java] SPOT serial number = 0014.4F01.0000.01A8

[java] Application slot contents:
[java] C:\cygwin\home\miyake\tmp\ServoTest
[java] 2350 bytes
[java] last modified Fri May 23 11:58:24 JST 2008

[java] Startup:
[java] Squawk startup command line:
[java] -flashsuite:10900000
[java] -Xboot:268763136
[java] -Xmx:478000
[java] -Xmxnvm:128
[java] -isolateinit:com.sun.spot.peripheral.Spot
[java] -dma:1024
[java] -MIDlet-1
[java] OTA Command Server is enabled
[java] Configured to run the current application

[java] Library suite:
[java] hash=0xa2fb25
[java] Installed library matches current SDK library
[java] Installed library matches shipped SDK library
[java] Current SDK library matches shipped SDK library

[java] Security:
[java] Owner key on device matches key on host

[java] Configuration properties:
[java] spot.external.0.firmware.version: 1.9
[java] spot.external.0.hardware.rev: 5.0
[java] spot.external.0.part.id: EDEMOBOARD_REV_0_2_0_0
[java] spot.hardware.rev: 5
[java] spot.mesh.management.enable: true
[java] spot.mesh.traceroute.enable: false
[java] spot.ota.enable: true
[java] spot.powercontroller.firmware.version: PCTRL-1.79
[java] spot.sdk.version: purple-071018

[java] Exiting

-run-spotclient-multiple-times-locally:

-run-spotclient:

BUILD SUCCESSFUL
Total time: 2 seconds


"ant info" checks the connected Sun SPOT information. If you see the same output as the above one, congratulations! Your installation was successful.

Sun SPOT Servo Car codes are now on java.net

I've launched a new project (https://servocar-spots.dev.java.net/) on java.net and imported all source codes for Sun SPOT Servo Car into it. Your feedbacks, comments and/or questions would be welcome!

Wednesday, May 21, 2008

Servo Car [ Sun SPOT app ] (3)

Hardware setup (cont'd)

Abstract

In a standard breadboard the holes of the breadboard are connected underneath. Different sets of holes are connected to each other in a variety of ways. This time I selected a breadboard having the following layout (the holes on the same red lines are interconnected each other) .


A servo has 3 connectors: Vdd, GND and I/O pin. I/O pin is used to send a pulse, so this pin has to be connected to Sun SPOT Hxx (H0 -- H3) pin. Here I choose H0 for the servo of right wheel and H1 for the one of left wheel. For this servo, White line is I/O pin, Red one is Vdd and Black one is GND (see below). Check the spec for your servo.


A battery pack has, of course, two wires + and -, so we need the following connections to make a servo work well with Sun SPOT.
  • battery + <---> servo Vdd <---> Sun SPOT VH
  • battery - <---> servo GND <---> Sun SPOT GND
  • servo I/O pin <---> Sun SPOT H0 (or H1)
How to connect

1. Place 2 headers on the breadboard


2. Connect the first servo to the first header


3. Connect the battery to the breadboard


4. Connect Sun SPOT and the first header on the breadboard (SPOT's H0 to I/O pin, SPOT's VH to Vdd and SPOT's GND to GND)


5. Connect the second servo to the second header. To supply the power to the second servo, you also have to connect two headers as the following (with 2 x orange wires).


6. Connect Sun SPOT and the second header on the breadboard (SPOT's H1 to I/O pin)


7. Finish


Next time, let's write a simple program for those servos.

Tuesday, May 20, 2008

Servo Car [ Sun SPOT app ] (2)

Hardware setup

OK, let's begin with hardware setup. For a servo car, we need the following hardware parts:

Those are
  • Sun SPOT x 2 (one on the car and the other for remote controller)
  • breadboard x 1
  • header pin x 3
  • battery (1.5V x 4) and battery pack
  • servo x 2 (each for right/left wheel)
  • jumper wires
You may find some differences between this and the previous one. Yes, the previous one doesn't use a breadboard because many jumper wires on a car look awful. However, to make it easier (in other words, to avoid any solder or other hassles), let's begin with breadboard kit.

You can choose any servo for this servo car demo, but one caveat is that you have to pick up what is so called "continuous rotation" servo. "continuous rotation" means it rotates forever in the same direction (90/180 degrees rotation servo can't be used for this demo. You know why??)

Next time, I'm showing the connections between components.

Monday, May 19, 2008

Servo Car [ Sun SPOT app ]

It's about time for me to write the detail of Sun SPOT applications. iRobot Create + Sun SPOT is such a candidate, but let's begin with a simpler one - "Servo Car". Before delving into hardware & software spec, please see the following video to get a general idea of this demo.

Tuesday, April 15, 2008

Sun Labs Open House 2008 Report (2)


In the Sun Labs Open House 2008, there is a Sun SPOT HOL (hands-on lab). This HOL is exactly the same one as the one in JavaOne 2008 that will be held on May 6-9 2008. So if you have a chance to participate in, please try it by yourself. Unfortunately, I wasn't able to take part in the HOL because I had to hear another session at the same time. But the HOL instructor lent me the full kit for this HOL, so I was able to try it after returning to the hotel.

The goal of this HOL is to control a servo (HiTec HS-311 Servo) remotely based on the input from a bend sensor (Flexpoint Sensor Systems bend sensor) like the following video:


The exercise is divided into 5 parts as follows
  • bend sensor hardware setup
  • bend sensor programming on Sun SPOT
  • servo hardware setup
  • servo programming on Sun SPOT
  • networking between 2 Sun SPOTs
and use breadboard to design the circuit. So if you're a software developer, but a beginner for electronic circuit, this exercise is just good for you.

Wednesday, April 9, 2008

Sun Labs Open House 2008 Report

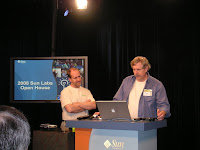
Today is the first day of Sun Labs Open House 2008 and I'm here in Menlo Park to participate in this event. I worked at Sun Labs last June for about 2 weeks to learn and create Sun SPOT demos, so my main purpose here is still for Sun SPOT, however, there were several cutting edge technologies other than it. So I'd like to introduce them as far as I can.

I heard some interesting JVM topics in the morning, but they are all internal-only sessions, so omit the details here. In the afternoon, I attended the following sessions:
  • Sun Small Programmable Object Technology (SPOT)
  • Project Live* [live star]
  • Project Squawk
and watched some demos. Here is a summary:

Sun Small Programmable Object Technology (SPOT)

This is a session to explain Sun SPOT overview & in-the-field including some demos. The agenda is divided into some topics: introduction, hardware, squawk, networking, security, solarium, emulator, in the field and hands on labs.
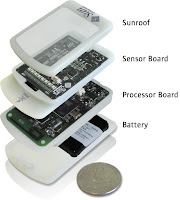
Sun SPOT device has three layers: battery, processor board with radio and sensor board. Processor board alone acts as a base-station that is connected to PC via USB to communicate with other Sun SPOT. And users can program the device entirely in Java using standard Java tools and/or IDE like NetBeans.

Here is Sun SPOT processor board (what is so called "eSPOT") spec:
  • 180 MHz 32 bit ARM920T core processor (Atmel AT91RM9200)
  • 512K RAM/4M Flash PROM
  • 2.4GHz 802.15.4 Radio Transceiver (TI CC2420)
  • USB interface - mini-b connector
  • Real Time Clock and Power Management Processor (Atmega88)
  • 3.6V rechargeable 750 mAh lithium-ion battery
  • 30 pin high density interboard connector
  • “Java on the metal” - No OS. Squawk VM runs on the bare metal
eDemoboard (sensor board) spec is:
  • 2G/6G 3-axis accelerometer
  • Light sensor
  • Temp sensor
  • 2 push buttons
  • 8 RGB 24 bit LEDS, power/control LED
  • 6 analog inputs readable by a 12 bit ADC
  • 5 General Purpose I/O pins (GPIO) and 4 high current output pins w/ Atmega88 IO processor
You can even make your own Sun SPOT hardware: eDemoboard is just a sample impl. shipped with Sun SPOT developer's kit (see the detail: eBones project).

Sun SPOT developer's kit includes
  • 2 x Full Sun SPOTs with eDemoSensor boards and batteries
  • 1 x base-station Sun SPOT
  • Software (Squawk VM, Java SDK, Netbeans)
  • Other equipments (USB cable, Mounting clips, 2 x wall mounts, 1 x PC board mount)
Sun SPOT radio is based on IEEE 802.15.4 (Zigbee) that is lower cost and power but slower than Bluetooth (802.15.1) or Wi-Fi (802.11). The radio spec is 128-byte packets, ~70m range, 250Kbps, 2.4 GHz and "autonomous mesh networking" extends communication range. It also has easy interface with internet-connected devices via HTTP, TCP/IP* (*TCP/IP implementation is now on going).

The new feature of security aspect (for a forthcoming SDK release) is SSL protocol support. To support SSL, you can just change the current syntax for opening a radio stream connection:

conn = Connector.open(“radiostream://” + addr + “:” + port);

to

conn = Connector.open(“sradiostream://” + addr + “:” + port);

Sun SPOT SDK also includes a great emulator, so you can try your program even if you don't have any real Sun SPOT!

In the field, Sun SPOT is utilized for several projects like "Project Blackbox" to keep track of conditions present in the box while in transit and Yggdrasil, common framework for data collection.

Project Live* [live-star]

Project Live* explores a new approach to software distribution and configuration of enterprise systems. Live* pushes the traditional installation process back to the factory. Software is distributed in the form of pre-installed immutable file system images that contain major software components, e.g. an OS, a database or an application server. At boot time Live* dynamically composes a collection of such modules into a single virtual software environment. Using a simple file system virtualization technology, Live* makes this composition entirely transparent to all existing software.

Also, similar to software in consumer electronics, Live* consolidates the system customization and configuration settings into a repository separate from the original software. This technology extends the concept of software distribution in the form of ready-to-run images like LiveCDs, with the true modularity and flexibility of customization.

In the demo room, the simplicity of Linux distribution upgrade is demonstrated as follows:
  • A user runs a Red Hat version A (for Live*) on xVM
  • the user makes a lot of customization on this system, e.g. network, font..
  • the user upgrades OS to a new Red Hat version B (for Live*).
  • After installation, he would usually need to reconfigure the above setting, but they are on Live* repository, so the user can use the new system seamlessly.
So, Live* software is even more advantageous when combined with VMware, xVM (Xen) or Virtual Box. It simplifies management while improving robustness and security.

Project Squawk

Squawk is a Virtual Machine designed for resource constrained devices like Sun SPOT (and now being planned to port to LEGO Mindstorms NXT and Custom FPGA). The Squawk
  • Implements J2ME CLDC 1.1/IMP 1.0 Profile
  • Runs on the bare metal (No OS)
  • Designed for memory constrained devices
  • Written mainly in Java
  • Runs multiple applications (isolates) that can be migrated across devices
  • Also runs on Solaris, Linux, Mac and Windows
  • Easy to port
Compared to Standard JVM, a lot of functions on Squawk JVM, e.g. loader, garbage collector, compiler and device driver, are written mainly in Java. With "isolates", One JVM OS process can run more than one applications on it and those applications can share some memories.

Saturday, March 8, 2008

iRobot Create with Sun SPOT (2)

I introduced a brief iRobot Create + Sun SPOT demo on the previous post, so here let me explain a bit deeply how this demo works.

Sun SPOT has many built-in devices, such as LEDs, light sensor, switches, accelerometer and GPIO (general purposes digital I/O) on its eDemo Board and also serves as an IEEE 802.15.4 wireless network node. You can write your programs using these devices as inputs (sensors & switches) and outputs (LEDs) as well as sensor networks with (your favorite!) Java language. It's because Sun SPOT platform has a main processor running the Java VM "Squawk".

I'm planning to write complete details for Sun SPOT on later posts, but here it's enough to go further to know that Sun SPOT has 3D accelerometer, digital I/O pins from/to external devices and IEEE 802.15.4 wireless network capability.

iRobot Create has driving motors and sound devices in addition to LEDs and digital I/O pins. So, now you can imagine how these two can be combined together.
  1. This demo uses one iRobot and two Sun SPOTs.
  2. One Sun SPOT (we call it "sender SPOT") works as a remote controller (you know Wii?) and measures 3D gravity accelerations with its accelerometer.
  3. Then, the sender SPOT tells these values to the other Sun SPOT (we call it "receiver SPOT") via wireless connection.
  4. The receiver SPOT receives these values via wireless connection and calculates which direction & how fast iRobot Create should move.
  5. Then, the receiver SPOT tells its calculation to iRobot Create via serial connection. This interface is called OI (Open Interface).
  6. iRobot Create moves around dynamically .
Next, I'm planning to delve into this iRobot Create OI (Open Interface) without Sun SPOT.

Friday, March 7, 2008

iRobot Create with Sun SPOT

Do you know iRobot Create, Sun SPOT or both of them? If you do, don't you think this combination is pretty cool?


iRobot Create is a derivation of iRobot Roomba which is known as a home cleaning robot. iRobot Create is a developer's version for this cleaning robot and a complete robot development kit that allows you to program new robot behaviors using iRobot Create’s Open Interface (OI).

On the other hand, Sun SPOT (Sun Small Programmable Object Technology) is a small, wireless, battery powered experimental platform from Sun Labs. Sun SPOT greatly simplifies to create a whole new breed of devices (See Sun SPOT for details).

Here, I'll plan to write some internal details of "iRobot Create + Sun SPOT" demo. In this demo, two Sun SPOTs are used; one is for a remote controller and the other is its receiver and controlling iRobot Create behavior (moving, powering on etc.). You can watch a brief demo in the following video: