Friday, March 21, 2008

Let's Play with iRobot Create (2)

iRobot Create Open Interface (OI) has many functions, such as controlling LEDs, playing songs and investigating sensors. However, for iRobot Create + Sun SPOT demo, what you need is only
  • Start command
  • Mode command
  • Drive command
"Start" command is a trigger to start OI. iRobot Create has 4 operating modes (Off, Passive, Safe and Full) depending on its control level. In iRobot Create + Sun SPOT demo, you can always use "Full" mode in which you can perfectly contorl iRobot Create, but here I use "Safe" mode which is nearly the same as "Full" mode except having cliff, wheel-drop and internal charger safety features (for detail, see iRobot Create spec).

"Drive" command is used to drive iRobot Create's wheels, which is the main command for this demo. Let's try it with a serial connection + Realterm as previous.

Drive command syntax (in serial sequence) is

[137] [Velocity high byte] [Velocity low byte] [Radius high byte] [Radius low byte]

The range of velocity is -500 to 500 mm/s and that of radius is -2000 to 2000 mm. There are 3 special cases for this radius value as follows:
  • 0x8000 or 0x7FFF: Straight (+ Velocity moves forward and - Velocity moves backward)
  • 0xFFFF: Turn in place clockwise
  • 0x0001: Turn in place counter-clockwise
So, if you want your iRobot Create to perform as the following video,


you need to send the following commands:
  • 128 131 (Start OI and puts the OI into Safe mode)
  • 137 0 100 128 0 (move forward at 100 mm/s)
  • 156 1 44 (until traveling 300 mm (3 s))
  • 137 0 0 128 0 (stop)
  • 155 20 (wait for 20 * 1/10 = 2 s)
  • 137 255 156 128 0 (move backward at -100 mm/s)
  • 156 254 212 (until traveling -300 mm (3 s))
  • 137 0 0 128 0 (stop)
  • 155 20 (wait for 20 * 1/10 = 2 s)
  • 137 0 100 0 1 (move counter-clockwise at 100 mm/s)
  • 157 1 105 (until rotating 360 degrees)
  • 137 0 0 128 0 (stop)
  • 155 20 (wait for 20 * 1/10 = 2 s)
  • 137 0 100 255 255 (move clockwise at 100 mm/s)
  • 157 254 152 (until rotating -360 degrees)
  • 137 0 0 128 0 (stop)
I haven't mentioned the "Wait" command above yet, so let me explain it here. iRobot Create OI has a few "Wait" commands that literally wait a next command until some events occur. "Wait Distance (Opcode: 156)" waits until iRobot Create has traveled the specified distance in mm. So the above "156 1 44" waits 3 seconds when it moves at 100 mm/s. In turn, "Wait Angle (Opcode: 157)" waits until it has rotated through specified agnle in degrees. "Wait Time (Opcode 155)" waits for the specified time.

Apart from that, you may as well have a tool converting a decimal integer to a hex. In Ruby, you can use the following script to investigate the value -100, -300 and -360 we used above.

$ cat conv.rb
#!/usr/bin/env ruby

ARGV.each {|n|
s = sprintf("%.4x", n)
puts "#{n} => #{s} (#{s[0,2].hex} #{s[2,4].hex})"
}
$ ./conv.rb -100 -300 -360
-100 => ff9c (255 156)
-300 => fed4 (254 212)
-360 => fe98 (254 152)


To execute the above command with Realterm, power on iRobot Create, send "128 131" first and the rest command at once:

137 0 100 128 0 156 1 44 137 0 0 128 0 155 20 137 255 156 128 0 156 254 212 137 0 0 128 0 155 20 137 0 100 0 1 157 1 105 137 0 0 128 0 155 20 137 0 100 255 255 157 254 152 137 0 0 128 0

Until now, we use serial connection with Realterm to test and understand iRobot Create behavior, but it's much interesting to program iRobot Create? OK, let's delve into it from next time.
Thursday, March 13, 2008

Let's Play with iRobot Create

I've written iRobot Create + Sun SPOT demo abstract on the previous two posts. From now, let's delve into iRobot Create internals.

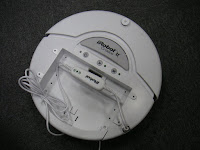
To control iRobot Create, you can use "iRobot Create Open Interface (OI)". iRobot Create has two electronic interface - 7 pin MINI-DIN connector and DB-25 connector to send OI commands. iRobot Create + Sun SPOT demo utilizes 7 pin MINI-DIN to control iRobot Create. Here, let's try some basic OI commands with this built-in serial connection.

Before proceeding, you need to have a serial terminal on your computer (You can download "Realterm" from iRobot Create site if you don't have any one. Realterm is a terminal officially recommended by iRobot).

iRobot Create kit includes a serial cable to 7 pin MINI-DIN and software drivers. To use Realterm (or other terminals), you must remember the serial COM port number to iRobot (on Windows, you can check it from device manager -> port).


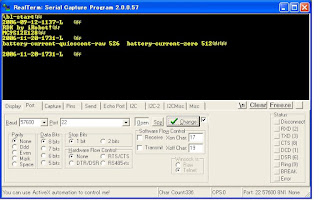
After connecting to iRobot, launch Realterm on your computer and go to "Port" tab. Set Baud = 57600 and port number you checked above. Then click "Change" button (without this, your change won't be properly reflected). You can verify the connection by checking that the following output appears on Realterm when powering on iRobot. If you don't, please check if the port number is set correctly.


Each Open Interface command is very simple. Just one byte "Opcode" + some data bytes (0 or more). For example, to turn on iRobot Create's Play LED (which is near ">" button), send

128 132 139 2 0 0

This means
  • 128 (Opcode) = starts the OI
  • 132 (Opcode) = puts the OI Full mode
  • 139 (Opcode) = controls LEDs
  • 2 0 0 (Opcode 139's data bytes) = the first byte indicates which LED you use ("2" = Play LED, "8" = Advance LED (near ">>|" button) or "10" = both of them). the second byte means LED color (0 = green, 255 = red) and the third byte means LED intensity.
To send this command, select "Send" tab, input "128 132 139 2 0 0" in the top left field and press "Send Numbers". After powering on iRobot Create, Power LED lights up and Advance LED blinks. If you see only Play LED lighting up after sending this LED command, your first OI command works perfectly! Congratulations!

Saturday, March 8, 2008

iRobot Create with Sun SPOT (2)

I introduced a brief iRobot Create + Sun SPOT demo on the previous post, so here let me explain a bit deeply how this demo works.

Sun SPOT has many built-in devices, such as LEDs, light sensor, switches, accelerometer and GPIO (general purposes digital I/O) on its eDemo Board and also serves as an IEEE 802.15.4 wireless network node. You can write your programs using these devices as inputs (sensors & switches) and outputs (LEDs) as well as sensor networks with (your favorite!) Java language. It's because Sun SPOT platform has a main processor running the Java VM "Squawk".

I'm planning to write complete details for Sun SPOT on later posts, but here it's enough to go further to know that Sun SPOT has 3D accelerometer, digital I/O pins from/to external devices and IEEE 802.15.4 wireless network capability.

iRobot Create has driving motors and sound devices in addition to LEDs and digital I/O pins. So, now you can imagine how these two can be combined together.
  1. This demo uses one iRobot and two Sun SPOTs.
  2. One Sun SPOT (we call it "sender SPOT") works as a remote controller (you know Wii?) and measures 3D gravity accelerations with its accelerometer.
  3. Then, the sender SPOT tells these values to the other Sun SPOT (we call it "receiver SPOT") via wireless connection.
  4. The receiver SPOT receives these values via wireless connection and calculates which direction & how fast iRobot Create should move.
  5. Then, the receiver SPOT tells its calculation to iRobot Create via serial connection. This interface is called OI (Open Interface).
  6. iRobot Create moves around dynamically .
Next, I'm planning to delve into this iRobot Create OI (Open Interface) without Sun SPOT.

Friday, March 7, 2008

iRobot Create with Sun SPOT

Do you know iRobot Create, Sun SPOT or both of them? If you do, don't you think this combination is pretty cool?


iRobot Create is a derivation of iRobot Roomba which is known as a home cleaning robot. iRobot Create is a developer's version for this cleaning robot and a complete robot development kit that allows you to program new robot behaviors using iRobot Create’s Open Interface (OI).

On the other hand, Sun SPOT (Sun Small Programmable Object Technology) is a small, wireless, battery powered experimental platform from Sun Labs. Sun SPOT greatly simplifies to create a whole new breed of devices (See Sun SPOT for details).

Here, I'll plan to write some internal details of "iRobot Create + Sun SPOT" demo. In this demo, two Sun SPOTs are used; one is for a remote controller and the other is its receiver and controlling iRobot Create behavior (moving, powering on etc.). You can watch a brief demo in the following video: